How to back up and restore (or migrate to a new computer) a WSL2 distro

Updated
3 min read
RSS feedIf you are following my Programming on Windows without the hassle articles’ series, you are probably also using WSL2 in your day-to-day work. Today, I’ll tell you about something very important in every system (and every system configuration): backup and restore.
When you have tuned your WSL2 distro for the work you made, installing the required packages, configure the shell interpreter, aliases, environment, networking, solved windows related issues, etc. etc. you don’t want them to be lost. Even better, if you mess up and break something, you want to revert to a fully working copy of your work environment asap.
Thought this tutorial, you’ll learn how to back up and restore a WSL2 distro full file system (virtual drives, system image) in a .tar compressed file, using native WSL PowerShell commands.
Backing up your WSL2 distro
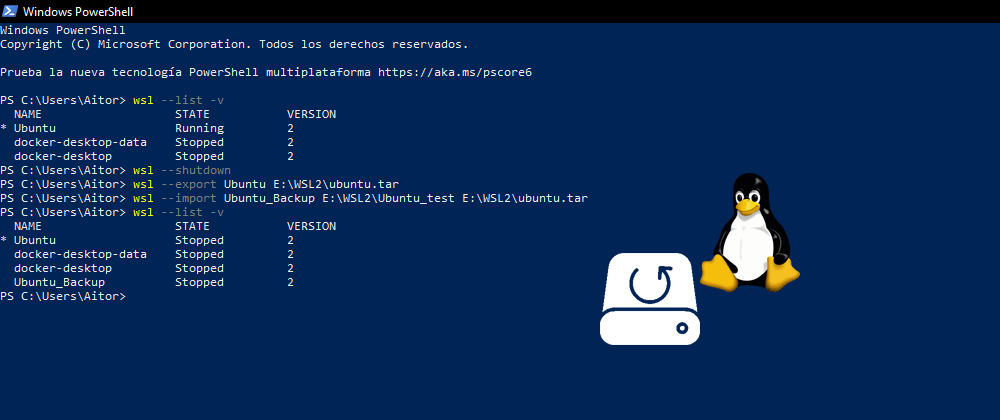
We need to stop the WSL2 distro and the WSL2 hypervisor to the backup to be completed without issues, so first, ensure the WSL2 distro you want to back up is not running. You can check that with the following command:
wsl --list -v
Click on image to enlarge
If the distro is running, like in my case, you can stop it with:
wsl --shutdownThen, to back up the distro:
wsl --export Distro_Name \Windows\destination\path\name.tarEnsure you have writing permissions in the destination path to the new backup file to be created. This can take a few minutes, depending on your WSL2 distro image size. The Distro_Name is the one you got from wsl --list.
Click on image to enlarge
Restoring or migrating your WSL2 distro
Once you have a backup of your distro, you can import it into WSL2 in any Windows machine with WSL2 enabled. As you have probably realized, every WSL2 distro installation has a name that we use to identify it in the commands. You cannot import it with a name that already exist, you must either remove the old distro and then import, or import it with a new name.
To remove the old distro installation:
wsl --unregister Distro_NameTo import the WSL2 backup (Note: the first argument is the path where the new WSL2 distro will be installed, i.e. where the virtual disk and all related files will be created):
wsl --import Distro_Name \New\Installation\Path \Windows\backup\path\name.tar
Click on image to enlarge
You can test your new imported distro with:
wsl --distribution Distro_NameNOTE: after the import, it’s probably that the new imported WSL2 distro boots up logging with the root user, instead of your regular user. That’s because we have in fact installed manually the distro, so Windows doesn’t know what is the default distro user (the one you configure when you install it from the Windows store) and therefore it falls back to root. The Microsoft recommended way to fix it is by adding a file in /etc/wsl.conf inside the WSL2 distro with the following content:
[user]
default=your_usernameIMPORTANT: after these steps, it’s probably that you need to re-enable docker support for the new imported distros, if you want to use docker inside them. Check the docker section in a previous post to know how to do it, if you don’t know how.
Bonus: setting the new imported distro as WSL2 default distro
You can set any installed WSL2 distro as default. The default distro is the one that will boot up and open when you execute bash.exe or something related to WSL in Windows. You can easily do that with:
wsl --set-default Distro_NameVoilà! I hope that was helping for you. Have a nice day!