How to configure Bazzite as a headless streaming gaming PC to play remotely in your LAN

11 min read
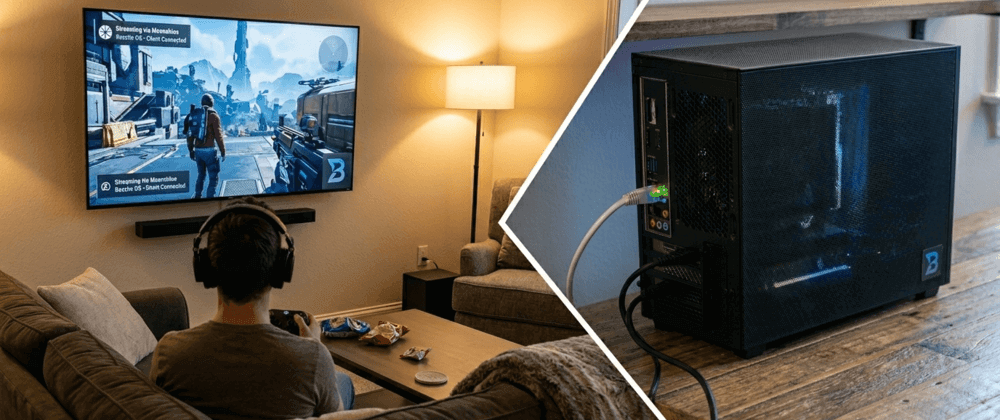
RSS feedI have a Linux gaming PC running Bazzite that I use exclusively for gaming. It sits in a corner of my house with just the power and the ethernet cable, and I connect to it remotely from my TV, my laptop, my iPad, or whatever device is closest to me at the moment. No monitor, no keyboard, no mouse attached to it. Just a box that boots up, waits for me, and streams games over my local network.
Getting to this point was not complicated, but it required a few pieces to come together: a streaming server, a client app, a dummy HDMI plug, and a way to log in without a screen. In this article, I’ll walk you through how I set it all up, so you can do the same with your own PC.
How is this possible?
I use two different pieces of free open-source software to make this magic work. Sunshine and Moonlight.
Sunshine is an open-source, self-hosted game streaming server. It runs on your gaming PC and captures whatever is on the screen (your desktop, a game, etc.) encodes it using your GPU’s hardware encoder, and streams it over the network with very low latency. It supports AMD, Intel, and NVIDIA GPUs, and you can configure it through a web interface.
Moonlight is an open-source game streaming client that connects to Sunshine. It originally started as an implementation of NVIDIA’s GameStream protocol, but with Sunshine as the host, it works with any GPU. Moonlight is available on pretty much every platform you can think of: Windows, macOS, Linux, Android, iOS, Apple TV, and even some smart TVs. It supports up to 4K resolution with HDR and up to 120 FPS on compatible clients.
The idea is simple: Sunshine runs on your gaming PC (the server), Moonlight runs on the device you want to play from (the client), and they talk to each other over your LAN. The result is that you can use your PC and play your PC games from your couch, your bed, or anywhere in your house, with a controller in your hands (or mouse and keyboard if you want) and a screen in front of you that is not your PC monitor.
Setting up Sunshine on Bazzite
Bazzite makes trivially easy to set up sunshine. It comes pre-installed, so you just need to enable it. Bazzite uses ujust as a command runner for common system tasks, and setting up Sunshine is one of them:
ujust setup-sunshineThis will open an interactive menu where you can choose to enable or disable the Sunshine service. Select Enable, and Sunshine will start as a systemd daemon that launches automatically on every boot.
Once enabled, you can access the Sunshine web interface with the same ujust command, but selecting the option Open Portal, or just going to https://localhost:47990 from a browser on the same machine (or via Moonlight later). The first time you open it, you’ll be asked to set up a username and password for the Sunshine admin panel. After that, you can configure your streaming settings from there, like encoder type, bitrate, and resolution. Personally, I didn’t configure anything here and left all defaults untouched.
I also recommend setting a static local IP address in your Bazzite PC. Although it is not necessary, it might simplify things later, like in case your PC doesn’t get auto-discovered by the Moonlight clients. There are multiple ways to setup this, including using the UI like going to System Settings in your desktop environment. All options are valid, and also out of scope for this article, as explaining them would make the article too large. You can always make a quick google search if you want.
Setting up Wake on LAN on Bazzite
I highly recommend also enabling Wake on Lan (WoL) on your Bazzite PC that you will use to stream games. WoL lets you power on your PC remotely by sending a special network packet (aka. “magic packet”) from any device on your LAN. Moonlight clients already has this feature, so you could power on your PC from any moonlight client you are willing to use.
To enable it, your network card needs to support WoL, and it needs to be enabled in the BIOS. Most modern motherboards support it, but the option might be disabled by default. Check your BIOS settings under something like Power Management or Wake Up Event Setup, and enable Wake on LAN or Resume by PCI-E Device.
Once that’s done, Bazzite makes the software side easy with another ujust command:
ujust toggle-wolThis will detect your active Ethernet interface automatically and show you the current status. You’ll get an interactive menu with these options:
- Enable — turns on WoL for the current session and creates a udev rule so it persists across reboots.
- Force-Enable — creates a systemd service that forces WoL on at every boot. Use this if the regular enable doesn’t stick.
- Disable — turns off WoL and removes the persistence rules.
I’d recommend starting with Enable, and if you find that WoL stops working after a reboot, switch to Force-Enable. In my case on a MSI motherboard, it was enough to use just the first option.
Setting up Moonlight on your devices
Moonlight is available on basically every platform. I use it on my iPhone, my iPad, my MacBook, and my XBOX Series X. The setup process is the same everywhere:
- Install Moonlight go to the official moonlight website to know from where download the client. For phones and tablets, it’s usually the default app store.
- Open Moonlight, and it will automatically scan your local network for Sunshine hosts. Your Bazzite PC should appear in the list. If it doesn’t appear, introduce the IP of your PC manually.
- Select your PC, and Moonlight will ask you to enter a PIN. This PIN will also appear on the Sunshine web interface (or on the PC’s screen if one is connected). Enter the PIN in Sunshine to pair the devices.
- That’s it. Once paired, you can launch your desktop or any game directly from Moonlight.
In Moonlight’s settings, you can adjust the stream resolution, frame rate, bitrate, and video codec. Here are the settings I’d recommend as a starting point:
- Resolution: match your client display or go with 1440p for a good balance.
- Frame rate: 60 FPS is the sweet spot for most setups.
- Video codec: I left this in auto, but if your hardware is fairly old and can only choose between HEVC (H.265) and H.264, chose HEVC (H.265) if your GPU and client support it. It gives better image quality at the same bitrate compared to H.264.
- Bitrate: if your local network is not a bottleneck, push it to 50–80 Mbps for excellent quality. In my case with a good network (ethernet cat. 5e or Wi-fi 6) the default bitrates from Moonlight work nice.
The dummy HDMI plug
Here’s where things get interesting if you want a truly headless setup. When you disconnect the monitor from your PC, the GPU detects that no display is attached and reports no available outputs. On Linux with KDE Wayland (the Desktop Environment I’m using), this means the desktop compositor (KWin) has nothing to render to, so it either fails to start or enters a fallback state. And if there’s no desktop session, Sunshine has nothing to capture and stream.
I found this out the hard way. Everything was working great with the monitor connected, but the moment I unplugged it and tried to connect via Moonlight, it just kept saying the computer was offline. Checking the logs confirmed the issue:
sddm-greeter-qt6: There are no outputs - creating placeholder screen
amdgpu: Cannot find any crtc or sizes
The solution is surprisingly low-tech: a dummy HDMI plug. It’s a small passive dongle (about the size of a USB flash drive) that you plug into your GPU’s HDMI port. Inside, it has a tiny chip with EDID data that tells the GPU “hey, there’s a monitor here.” The GPU believes it, creates a real display output, and everything works as if a monitor were connected.
You can find them on Amazon for about €5–8. Search for “HDMI dummy plug 4K” and pick any well-reviewed one. Make sure it advertises 4K (3840×2160) resolution, so that KDE and Sunshine offer you proper resolution options (some cheaper ones only report 1080p, which would limit your streaming quality).
I went with an HDMI dummy plug specifically because my GPU (an AMD Radeon RX 5700 XT) has HDMI 2.0b, which supports 4K at 60Hz, more than enough for Moonlight streaming. I also wanted to keep the DisplayPort outputs free in case I ever want to connect a real monitor again. But if you prefer DisplayPort, those dummy plugs exist too and work the same way.
Once the dummy plug is in, the headless boot looks exactly like a normal boot with a monitor. KDE starts properly, Sunshine captures the desktop, and Moonlight connects without any issues.
Going fully headless: logging in without a screen
With the dummy plug solving the display problem, there’s one more challenge: how do you get past the login screen without a keyboard and a monitor? Here, you have a few different options, depending on your security concerns, and how much do you want to complicate things.
The easy option: auto-login
The simplest approach is to configure not password for your user, and configure SDDM (KDE’s display manager) to auto-login. You can create a file at /etc/sddm.conf.d/autologin.conf with:
[Autologin]
User=yourusername
Session=plasma
Relogin=true
This makes SDDM log you in automatically at boot. Relogin=true means it will also re-login if the session crashes, which is important for a headless machine that needs to recover on its own.
The downside? As your user has not password, someone with physical access to the machine could access your desktop with just plugin in a monitor and a mouse and keyboard. For many people this is perfectly fine, but I couldn’t leave it like that. Like, what I have the bad luck that someone breaks into my house and steals the whole PC? I have Steam with my credit card there, and also I’m logged into my email there.
The YubiKey option: physical token authentication
I have a YubiKey, a small hardware security key, and it turns out you can use it as a login token for KDE. The idea is that instead of typing a password, you plug the YubiKey into a USB port and SDDM authenticates you automatically via FIDO2/U2F. No typing, no screen needed.
On Bazzite, the pam-u2f package is already installed (you can verify with rpm -q pam-u2f). Setting it up involves two steps:
1. Register your YubiKey:
mkdir -p ~/.config/Yubico
pamu2fcfg -o pam://localhost -i pam://localhost > ~/.config/Yubico/u2f_keys
Touch the key when it blinks. This generates the credential file that PAM will use to verify your identity.
2. Configure PAM for SDDM and the KDE screen locker:
Add the following line before the auth substack password-auth line in both /etc/pam.d/sddm and /etc/pam.d/kde:
auth sufficient pam_u2f.so authfile=/home/yourusername/.config/Yubico/u2f_keys cue origin=pam://localhost appid=pam://localhostThe sufficient keyword means: if the YubiKey authenticates successfully, skip the password prompt entirely. If the key isn’t present, fall through to the normal password prompt. You never lose the ability to type your password as a fallback.
With this setup, my boot flow looks like this:
- Power on the PC (via Wake on LAN or the power button).
- A wait a minute, as I know it takes 40-50s to my PC to get into login screen.
- I plug in the YubiKey, I touch it a few times until it blinks → SDDM detects it and logs me in.
- Sunshine starts capturing the desktop → I connect from Moonlight on any device.
Someone finding the PC would need my YubiKey or my password to get in. And the YubiKey is always with me.
The downside? While the setup is headless, I need to wake up and walk to the computer to plug the YubiKey and touch it to login. With the auto-login option, I can just sit on my sofa or lay on my bed, boot it up remotely with WoL, and start playing once it boots.
Conclusion
And that’s it. With Sunshine on Bazzite, and a Moonlight client on whatever device you want, you can use your gaming PC to stream games anywhere in your LAN. You get a fully silent gaming PC that you can wake up, log into, and play from anywhere in your house. If you want to go a extra step, you could buy a dummy HDMI plug and make the whole setup headless. Do you want more security? Add a YubiKey for secure headless login.
Happy gaming!